phpdocx Tutorial

phpdocx 17 Tutorial
phpdocx is very easy to install. Usually it is just enough to unzip the package somewhere in your server and it is (almost) ready to go.
phpdocx requires PHP 5.6 or newer (phpdocx is compatible with all PHP versions from PHP 5.6 to PHP 8.5) to be installed in your server. Moreover the following PHP modules should be activated:
- ZipArchive
- XSL
- Tidy (not strictly necessary but needed to transform HTML to DOCX)
For your convenience there's a PHP script included in the package (directly located in the app root folder), check.php, that will check if any of the requirements are missing.
Of course, DO NOT FORGET to include the license key:
- Download the license key from the "MY PHPDOCX section" of this website.
- Copy it (plain, with no other word or character) in the code option of the config/phpdocxconfig.ini file.
- Include the domain (Advanced version) or the IP (Premium version) in the value option of the config/phpdocxconfig.ini file.
License keys are meant for purchase licenses. The Trial package doesn't need a license key to run.
- The folders where your scripts are running and/or the folder where you want to store the resulting Word documents must have writing permissions rights.
- If possible, use always UTF-8 compatible editors to code your scripts or modify any script in the phpdocx library. The final Word documents have to be UTF-8 encoded and non UTF-8 characters may break the final document.
- All the content in a .docx file is stored in XML files so you should escape certain protected characters like the ampersand symbol (write & instead of &).
- Make sure that your web server has activated the .docx MIME type in case you want your users to download directly the resulting Word documents to the browser (if not IE will believe that your .docx is a .zip file).
WARNINGS:
There is no a priori restrictions about the OS and server software as long as it may run PHP 5. That includes, of course, basically all LINUX and UNIX distributions as well as Windows and macOS. You may use Apache as web server or lighttp, nginX, IIS, etcetera.
phpdocx accepts external data for your reports and documents coming from virtually any data source and it is the responsability of the user to prepare it so phpdocx can represent it adequately. phpdocx DOES NOT require MySQL or any other specific Database software for its deployment and correct functioning.
You DO NOT need any copy of Microsoft Office Word to generate the Word documents.
phpdocx does also not need any kind of outbound connection to work so it does not depend directly of a working Internet connection or any kind of additional third party software.
The following samples use the classic package. The namespaces package and the Practical guide include samples using phpdocx with namespaces.
Let's start with the standard "hello world" document.
The required script reads as follows:
The first line: require_once 'path_to_phpdocx/classes/CreateDocx.php' is a call to the main class in phpdocx, and path_to_phpdocx has to be substituted by the actual path to the library relative to the current script.
You can see here the final result and download the corresponding Word document :
![]()

OK, this has been simple enough but not very rewarding. Let's go one step further and introduce a little more of formatting:
Now this starts to look a little nicer although there's still some work ahead:
![]()

At this point one may wonder if there is a simple way to "wrap" our document in a more beautiful frame including, for example, headers and footers and even a first page.
There are quite a few ways to do so:
As we have not yet talked about templates (base or custom) and the addHeader and addFooter methods require of certain concepts not yet introduced, we will restrict ourselves,by the time being (please, be patient), to the first of the available options.
We have already prepared a standard Word document (.docx) with a nice header and footer that we would like to insert in our current document. Its relative path to this script is, for example, resources/niceHeaderAndFooter.docx.
Let's proceed:
This is definitely starting to look much nicer:
![]()

If you prefer only to import the header you may have called:
and equivalently
if you only wish to import the footer.
Footers and headers can include photos, tables, standard text, lists, links, shapes, etcetera. The import procedure also preserves the display properties of the headers and footers (first, even and odd pages).
Now to continue we are going to populate our Word document with a series of standard objects:
- Lists
- Tables
- Images
- Charts
There are many other possibilities but we prefer to refer to the documentation for a complete set of examples in order not to clutter this tutorial with unneeded details.
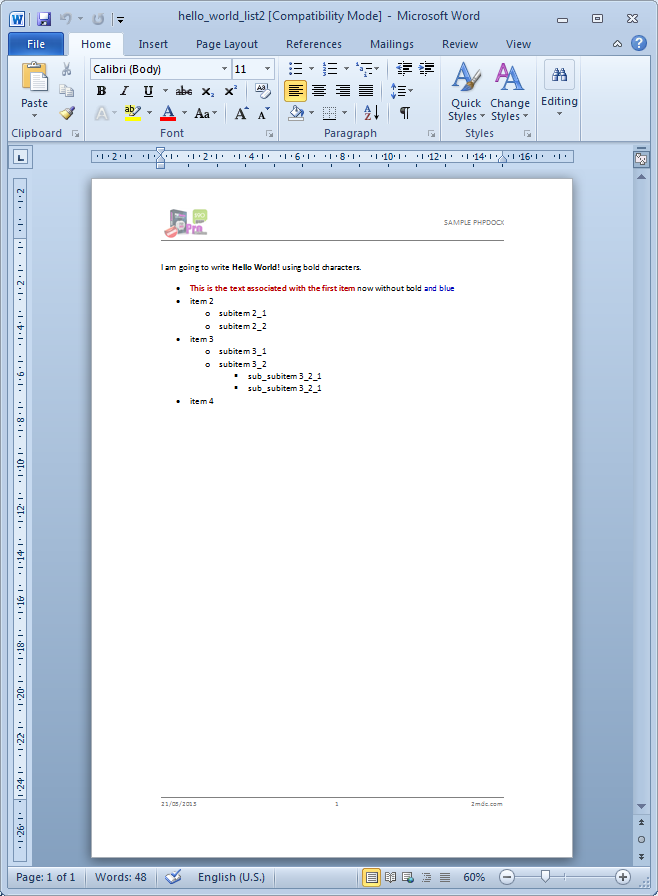
Let us first include a simple unordered nested list after our "hello world" paragraph. In order to do so you should call the addList method:
The result looks like this:
![]()

If you had chosen the second parameter to be 2 instead of 1 you would have got a standard numbered list. Now you may wonder:
- How can I get more sophisticated list styles?
- How can I insert something more than plain text as an item for a list?
The answer to the first question is pretty simple: you may run the parseStyles() method (see example) in a separate script and generate a Word document with all the info about the list, paragraph and table styles that are available by default. We will see later that if you choose to use your own "base template" you may incorporate all the styles you wish. You may also call the createListStyle method to generate your own list styles in execution time.
The answer to the second question is a little more elaborate but still simple enough: you should create a WordFragment to achieve more sophisticated formatting:
The corresponding code reads:
And you get:
![]()
This way to insert elements one within the other may be extended to other cases very easily:
- Create a new WordFragment (WordFragment class).
- Include all the required content into the WordFragment with standard phpdocx methods.
- Insert the resulting WordFragment:
- Within a table.
- Within a list (only inline content).
- Anywhere in the Word document with the insertWordFragmentBefore/After methods.
- In the headers and footers via the addHeader and addFooter methods.
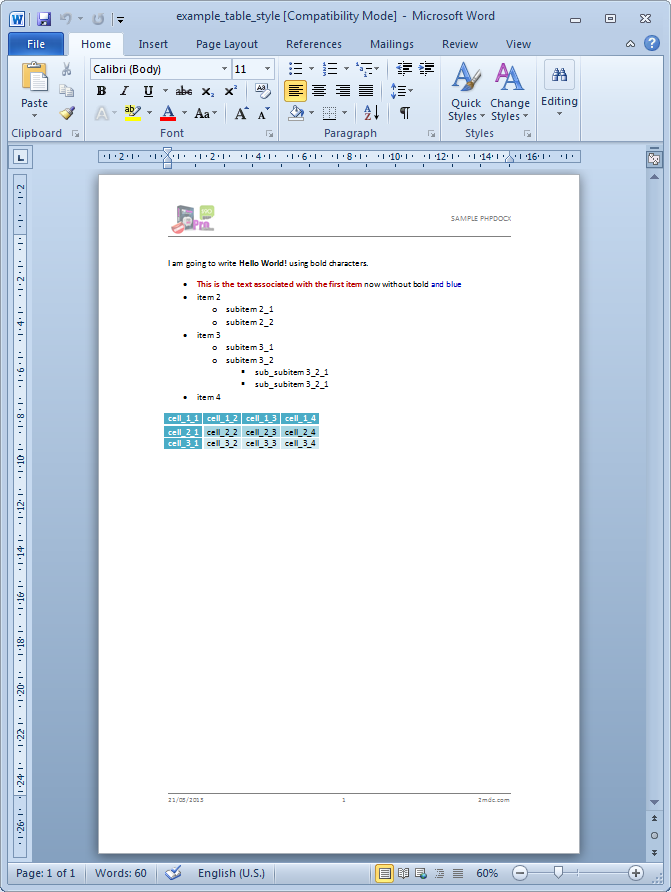
Now we will try to insert a simple table so our Word document gets richer in contents.
And you get:
![]()

This is certainly not the most beautiful table you have ever seen but we can solve that problem pretty easily by having a look at the available table styles in the document that we have generated before with the parseStyles() method.
For example, you may use the "MediumGrid3-accent5PHPDOCX" accent table style (blame Word for the funky names):
This certainly looks much nicer and pretty simple to implement:
![]()
Although this example clearly does not exhaust all the table formatting capabilities of phpdocx we leave the nitty-gritty details to the addTable method API documentation.
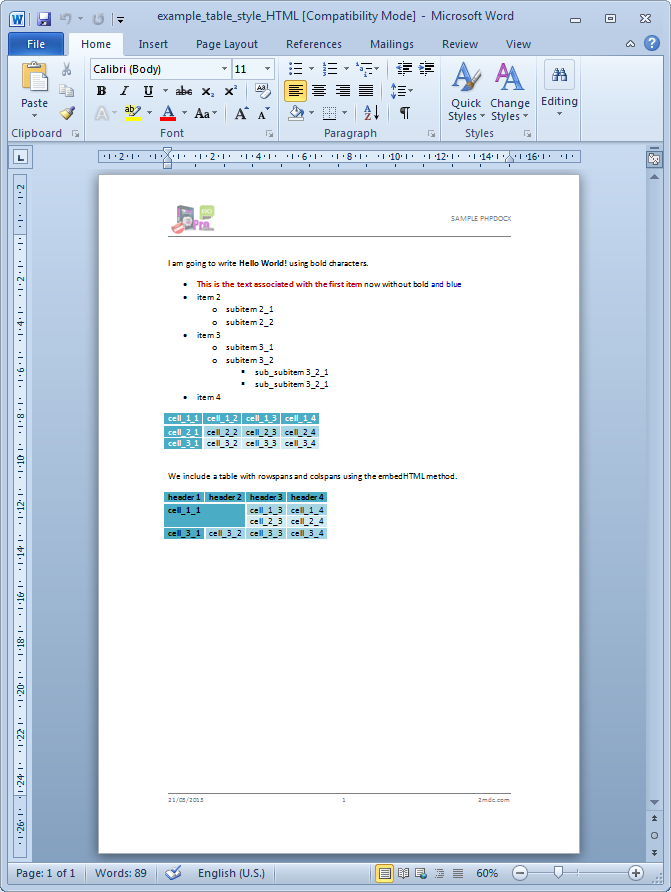
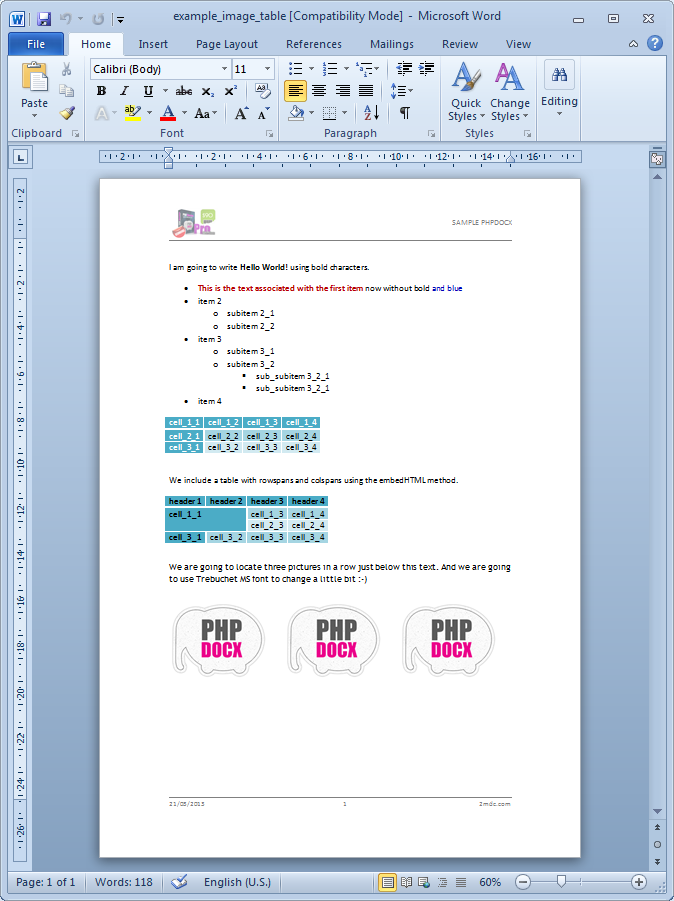
But one always want something more and eventually one may need to insert tables with "rowspans" and "colspans". What can we do about that?
The simplest way (although not the only one) to do that it is to parse an HTML table and associate a Word style to it.
As our script is starting to get a little lengthly let us concentrate only in the relevant part of it. Let's define a $myTable variable as follows:
This should render a table like this:
![]()
By the way, if you do not like the styles that come bundled with phpdocx (basically the quick styles that come with the standard Word 2007 distribution) you may import custom styles from other Word document using the importStyles() method or by using your own base template.
- If you use px instead of pt as your CSS units take into account a 0.75 relative scale factor
WARNING:
As you can foresee the embedHTML method may have multiple uses but for the sake of brevity we will ignore them by the time being and we will move forward to investigate how to include images and charts.
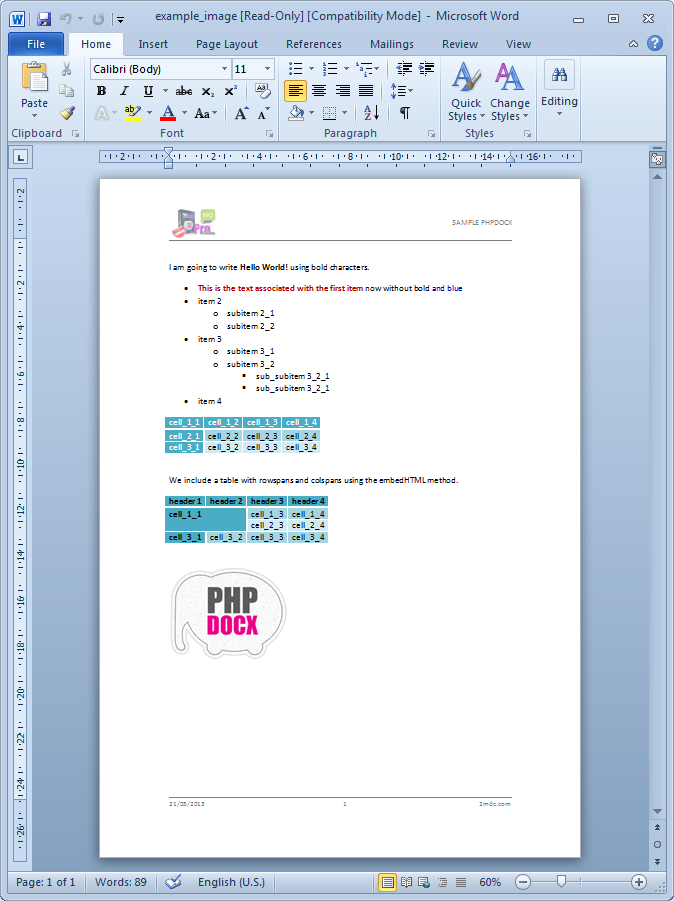
To insert an image is as simple as this:
This should render an image like this:
![]()
If you need to include more than one photo with a precise layout you may combine the addTable method with WordFragments to generate the desired ouput. For example:
This should now render the three inserted image like this:
![]()
To finish with the most basic functionality of phpdocx we are going now to insert a chart.
phpdocx virtually allows to include any chart that can be included through the standard Word interface:
- 2D and 3D pie charts
- 2D and 3D bar graphs
- 2D and 3D col bars
- 2D and 3D area charts
- 2D and 3D line charts
- 2D and 3D surface charts
- 2D and 3D bubble charts
- radar charts
- doughnut charts
- scatter charts
- box & whisker charts
- histogram charts
- funnel charts
- sunburst charts
- treemap charts
- waterfall charts
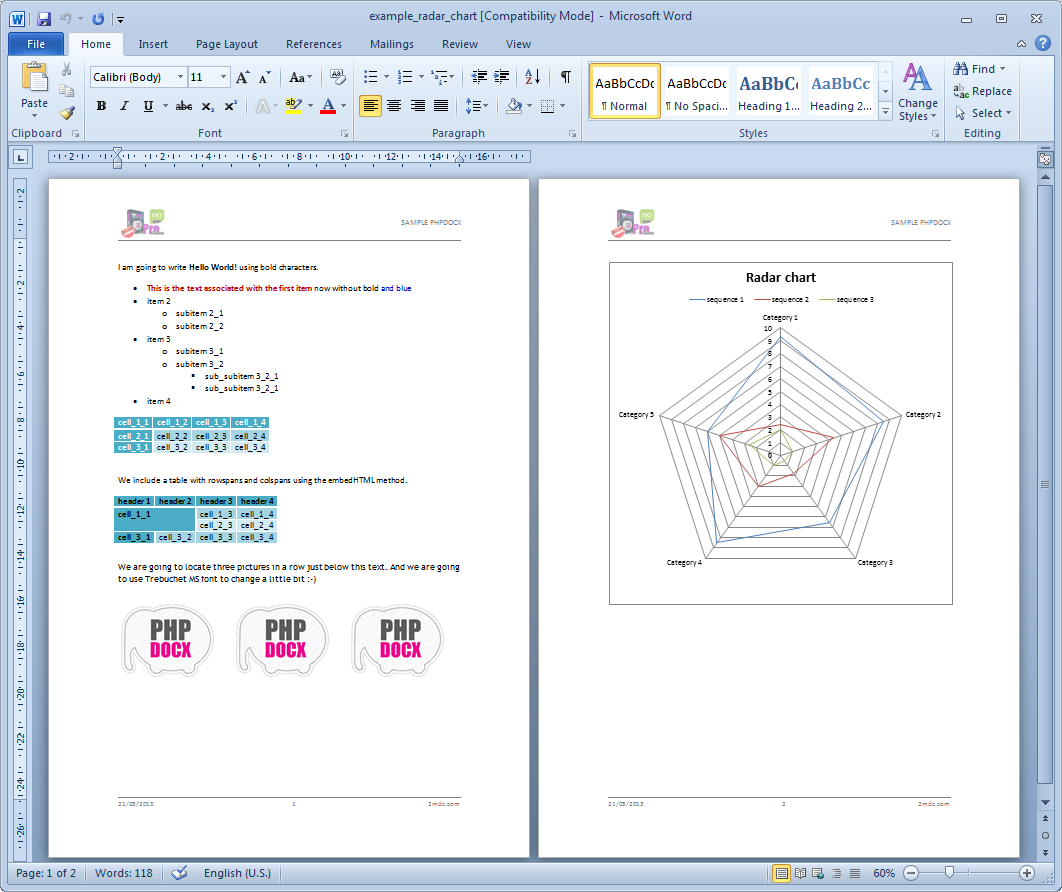
As an example we will insert a radar type chart:
And you get:
![]()
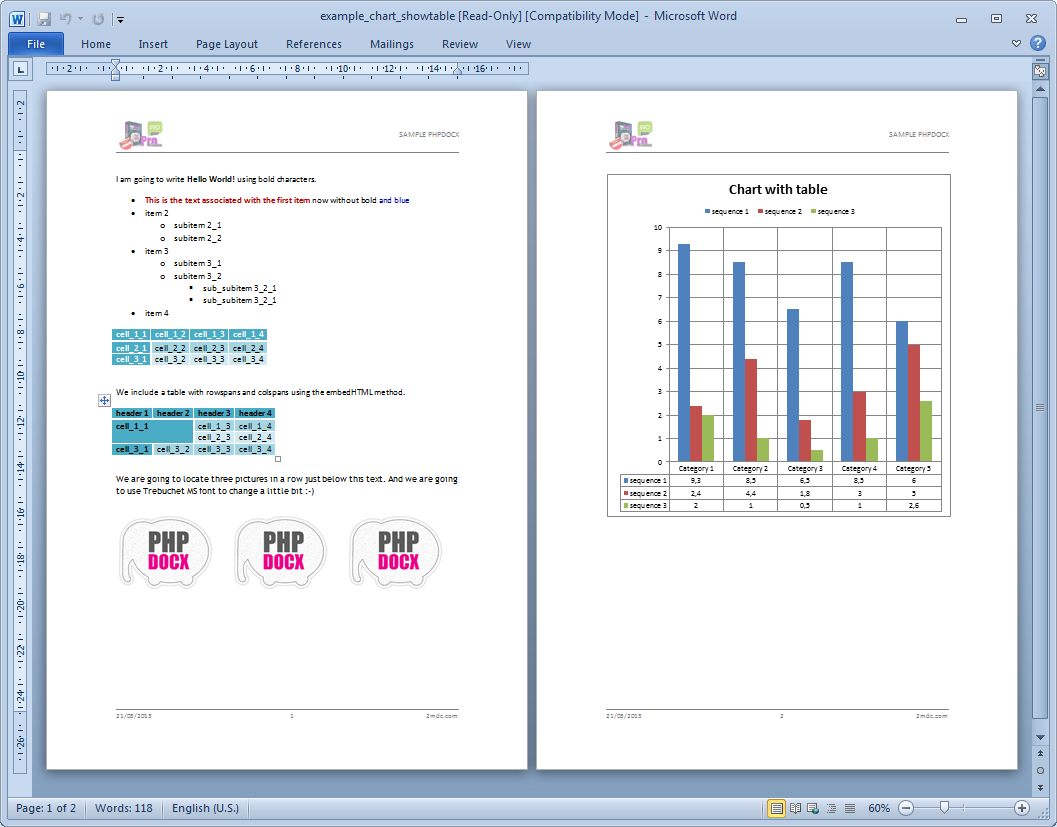
In order to see all the available options you should visit the Full reference Documentation, nevertheless to illustrate the flexibility of phpdocx you may easily create a bar chart with the associated data data table just by setting the ’showtable’ option to 1 and setting the type to "colChart":
So this time we will obtain:
![]()
Using your own base template and setting up general config options
We have already commented that phpdocx users may use their own "base templates" in order to generate their custom documents or reports.
The procedure is quite simple. One only has to make a call to the desired template whenever a new DOCX is created:
As you may see from the result:
![]()
You may get customized headers and footers as well as many other configuration options in just one shot.
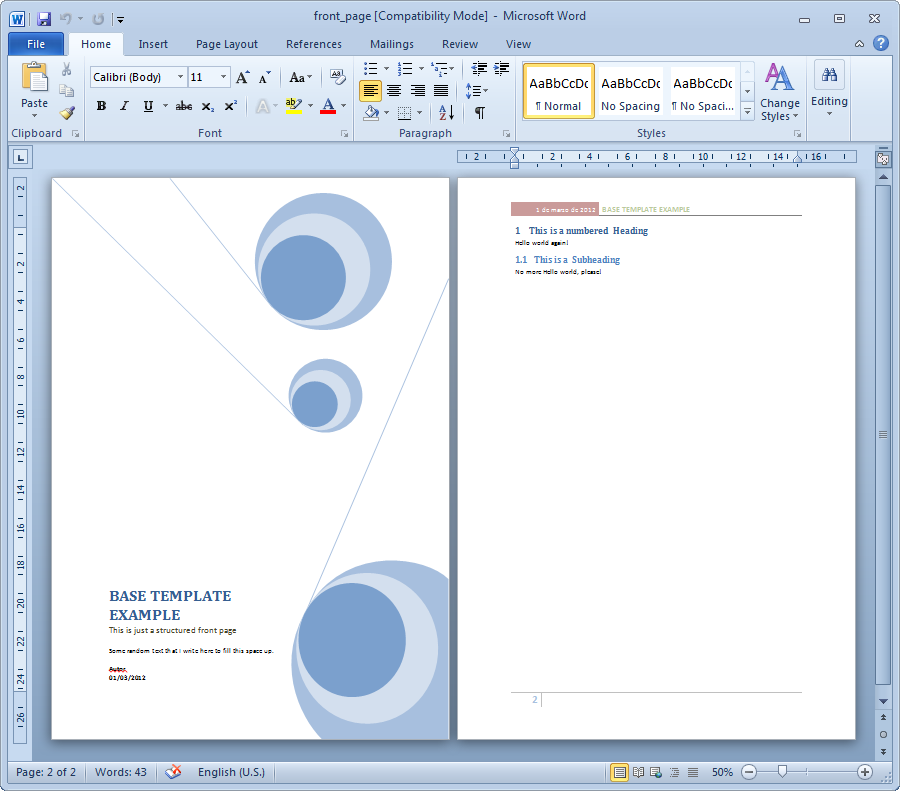
For example you may also include a "front page" as structured content that will be preserved by phpdocx:
So we get:
![]()
Nevertheles to use the default template may show convenient because it has been prepared to have available all the standard Word style options.
If you work with your own template make sure, by using the parseStyles() method that you have enough styles at your disposal.
- The contents of your baseTemplate will be ignored (only headers,footers and "front page", if it has been inserted as structured content, will survive in the final document). If you really want to work with an existing template for your document content you should run the CreateDocxFromTemplate class on which we will elaborate on next section.
WARNING:
It is quite often that rather than writing a full document from scratch you just need to do certain modifications on an existing one:
- Include a client's name.
- Redraw a chart depending on new dynamical data.
- Populate a table with certain dynamical data coming from a database, i.e. items in an invoice.
- Change certain images.
- Etcetera.
For all those cases phpdocx allows to use an existing Word document and do all the required substitutions just by inserting the adequate placeholders variables.
For example, if we have a letter where the only "variable" part of it is a name we could:
- Replace the name by the variable: $NAME$.
- Extract from a data source the actual name to be used in the resulting document and perform the substitution via the replaceVariableByText() method.
Let us carry out this process in greater detail.
First, write with your favourite Word editor a brief Word document like this:
Dear $NAME$,
I would like to say something interesting but unfortunately I do not have much to say.
Best regards,
phpdocx Guru
- Do not forget to save your document with the .docx extension and call it, for example, myTestTemplate.docx.
WARNING:
The required phpdocx script needed to carry away the replacement is as simple as this:
And you will get as a result:
![]()

If you wish you may change the symbols used to enclosed the placeholder variable to, for example ‘#’ using setTemplateSymbol('#') or '${ }' using setTemplateSymbol('${', '}').
- Do not forget to save your document with the .docx extension and call it, for example, myTestTemplate.docx.
WARNING:
phpdocx can also substitute a variable by HTML, a WordFragment, an external file, etcetera. This simplifies greatly the process to include new content into a Word document.
In particular, replaceVariableByHTML() basically extends the functionality of the embedHTML() in the case of templates. But everything may be more easily explained by a simple example.
Let us assume that you want to include some information coming from a web page into the Word document. You may do so, preserving the format of the original HTML document in a very simple way:
And you will get as a result:
![]()
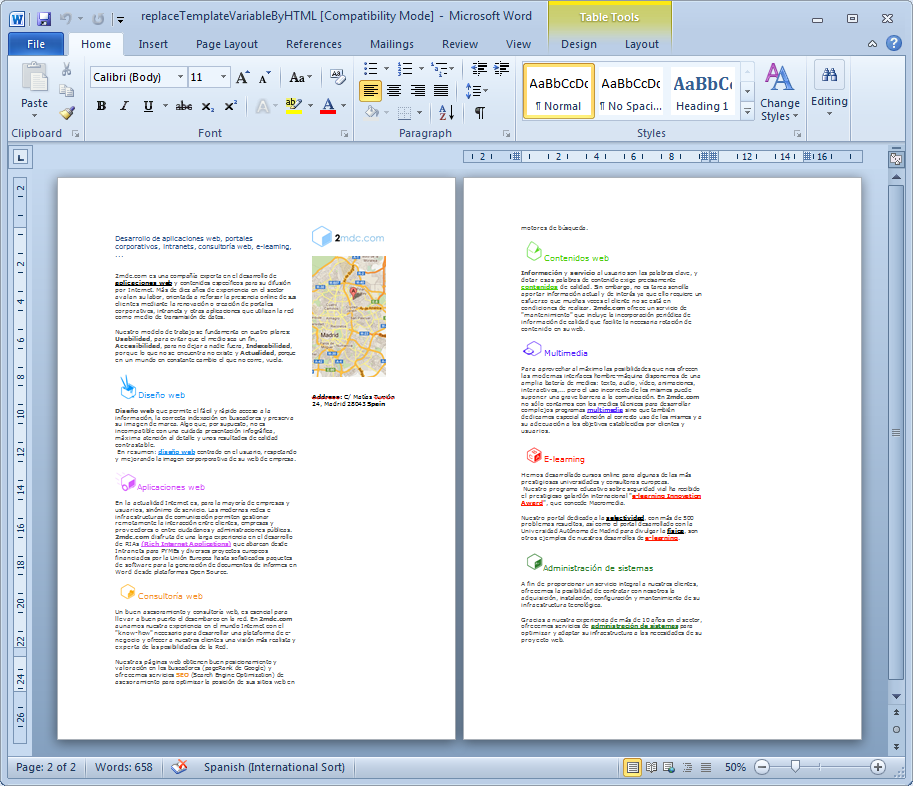
The HTML content, as seen in the example, may come from a external HTML page or from a string. The filter parameter has been used to select several portions of the original HTML code and insert them in the Word document as desired. It does not only admit single id references: you can introduce an array with different ids, classes and tags of your choice.
Now we are going to show you an example that you may see at work in this very same website: http://www.phpdocx.com/demos.
This demo requires three different templates that you may download, from this ZIP file available online.
Let us first have a look at the whole script:
Let us analyse this script step by step.
The first chunk of code reads:
We just create a new phpdocx instance via the CreateDocXFromTemplate class to deal with custom templates. We load into phpdocx the template choosen by the user (in the corresponding web form).
In the following block of code we start the actual parsing of the selected template:
These lines of code perform a standard "variable by string" substitution. The first variable is replaced by the current date that is obtained using the standard PHP date() method while the VAR_NAME (in the header) and VAR_TITLE (front page) variables are replaced by the values introduced by the user in the corresponding web form.
Now things start to get more sophisticated with:
We first create a new chart from scratch with the data introduced by the user in the web form, after that we create a WordFragment with the generated chart and insert it in place using the replaceVariableByWordFragment method.
By the way, you may notice that in case the user has not provided us with the required chart data the whole section is removed via the deleteBlock method.
The following chunk of code is particularly interesting because it allows us to populate a table with a custom number of rows depending on the user input:
Once again we check if there is data to populate the table and in the contrary case we remove the corresponding block of the document.
If the user has provided us with some data we format it as an array and insert it in the preformatted table with the replaceTableVariable() method.
This block of code:
checks if the user has included any text in the "Rich Text Editor Box" avalaible in the web form and if so includes it as HTML via the replaceVariableByHTML method.
The job is almost done. The end of the code replace an existing placeholder image with the image used by the user via the:
And we finally clean any reamining BLOCK tags with the clearBlocks() method before sending the final DOCX to the browser.
We hope that this tutorial has been of help and that you are now able to grasp all the potential uses that you may give to phpdocx in your professional projects.
Enjoy!!